With the release of Azure Container Apps we now have a flexible alternative to Azure Functions that allows using the full power of ASP.NET Core in a fully serverless way that can scale down to zero when unused.
I needed to do some web automation and thought that having this readily available in the cloud on-demand would be pretty neat, so I set out to figure out how to run headless Chromium on a container app, driving automation using Playright for .NET.
TIL: clone the scraper repo and follow the readme instructions.
Rather than copying the whole readme here, I’ll point out a few things that are noteworthy in the repo.
The Code
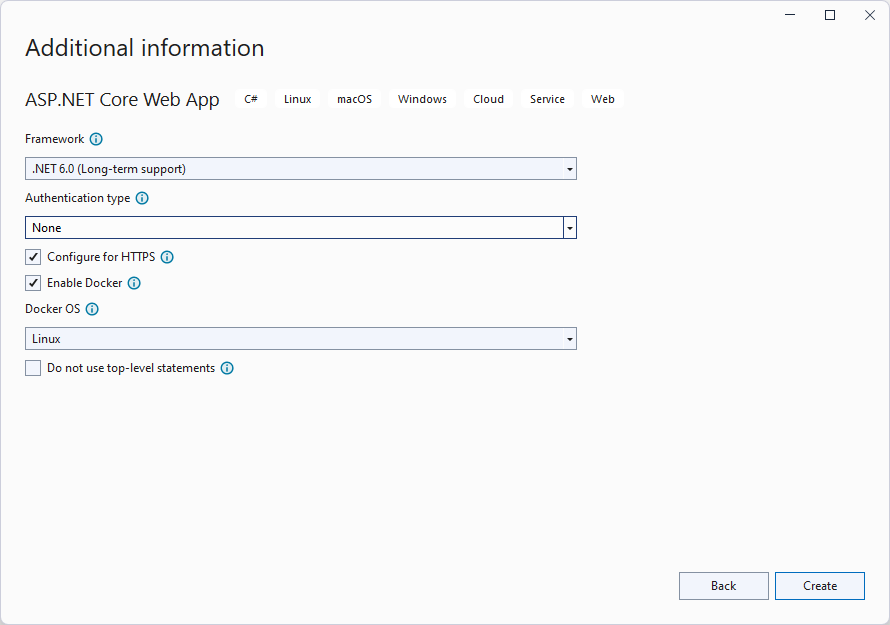
Creating a new container app using Visual Studio is incredibly straightforward, just select “New ASP.NET Core Web App” and all the checkboxes are the “right ones” out of the box:
Azure container apps run on Linux, so in addition to referencing Microsoft.Playwright package:
<PackageReference Include="Microsoft.Playwright" Version="1.22.0" />
You have to specify what platform it will run on, so the right browser drivers are installed:
  <PropertyGroup>
    ...
    <DockerDefaultTargetOS>Linux</DockerDefaultTargetOS>
    <PlaywrightPlatform>linux-x64</PlaywrightPlatform>
The app is a simple minimal API app that will receive requests to scrape a webpage like:
{
  "url": "...",
  "selector": "[CSS SELECTOR]",
  "browserOnly": true|false|?
}
(browserOnly=true meaning use Playwright up-front to fetch the page, instead of first trying HttpClient).
Since instantiating the chromium browser is not cheap, I’ll make both the IPlaywright and IBrowser singletons and async lazy instances.
Cat some helpers
As usual, I could use a few helper classes and extension methods I’ve cooked up over the years for this and that. And I could just copy/paste yet again another Helper/Common project. I’m trying something new nowadays. Something lightweight but at the same time convenient to update/evolve over time.
I keep these helpers neatly organized in a catbag repo:
🐱bag: A repository of loose helpers, base clases and assorted code …
Now, rather than submoduling an entire repo with code that uses a myriad dependencies and what-not, or creating yet another CommonHelpers nuget, I will instead cherry-pick specific files to “cat” into my repo. The way to do this is via the dotnet-file dotnet global tool.
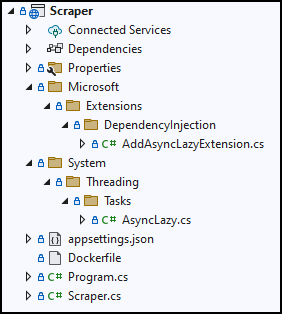
For this project, I run the following commands to get the async lazy stuff (which we’ll use in a bit):
> dotnet file add https://github.com/devlooped/catbag/blob/main/Microsoft/Extensions/DependencyInjection/AddAsyncLazyExtension.cs .\src\Scraper\

> dotnet file add https://github.com/devlooped/catbag/blob/main/System/Threading/Tasks/AsyncLazy.cs .\src\Scraper\
This brings AddAsyncLazyExtension.cs and AsyncLazy.cs into the Scraper folder, and since I kept the trailing separator by using .\src\Scraper\, dotnet-file will interpret that as a desire to recreate the GitHub repository folder structure inside that folder, so we end up with:
NOTE: if I had ended up the path with a dot, it tells dotnet-file to instead copy the files directly into that directory. If no target path is used at all, the folder structure is created from the current directy.
The best part is that I also have a “standard” dotnet-file.yml workflow that can fetch updates from whichever upstream repository or repositories I added files from, collect changes, create a PR and even provide a super-clean description with pointers to each commit that changed each file. The PR is even automatically re-created so that you only ever have one rolling update to merge. Changes from multiple repositories will also be grouped appropriately.
This makes it quite easy to keep tabs on those files I “copied” from around.
With this in place, I can async-init Playwright, for example:
var builder = WebApplication.CreateBuilder(args);

builder.Services
    .AddAsyncLazy()
    .AddSingleton(_ => Playwright.CreateAsync())
Now any component can take a dependency on the asynchronously initialized IPlaywright interface by using the AsyncLazy<IPlaywright> type and just awaiting it for use. See the section on the scraper a bit below for that.
The tricky part now is that the default Dockerfile created by VS will not contain any chromium browser that we can run. So let’s see how we can get a chromium browser in place for that.
Referencing a portable Chromium
There wasn’t a nuget package that contained a bundled chromium that I could use, so I had to learn how to package native binaries properly for consumption via NuGet. Long-story short, it’s non-trivial unless you’re using NuGetizer. I mean, not that I’m objective about it, but look at the packaging project for the linux binaries:
<Project Sdk='Microsoft.Build.NoTargets/3.5.0'>

  <PropertyGroup>
    <Description>Chromium native binaries for Linux x64 runtime.</Description>
    <TargetFramework>net6.0</TargetFramework>
    <RuntimeIdentifier>linux-x64</RuntimeIdentifier>
    <PackageId>$(MSBuildProjectName)</PackageId>
  </PropertyGroup>

  <ItemGroup>
    <PackageReference Include="Microsoft.SourceLink.GitHub" PrivateAssets="all" />
    <PackageReference Include="NuGetizer" PrivateAssets="all" />
  </ItemGroup>

</Project>
And then the tiniest bit of MSBuild in a Directory.targets that pulls in the actual assets:
  <PropertyGroup Condition="'$(RuntimeIdentifier)' != ''">
    <EnableDefaultItems>false</EnableDefaultItems>
    <RuntimeOs>$(RuntimeIdentifier.Substring(0, $(RuntimeIdentifier.IndexOf('-'))))</RuntimeOs>
    <RuntimeOs Condition="'$(RuntimeOs)' == 'mac'">osx</RuntimeOs>
  </PropertyGroup>

  <ItemGroup Condition="'$(RuntimeIdentifier)' != ''">
    <None Include="readme.md" Condition="Exists('readme.md')" Pack="true" />
    <None Include="chrome-$(RuntimeOs)/**/*.*"
          PackagePath="runtimes/$(RuntimeIdentifier)/native/%(RecursiveDir)%(Filename)%(Extension)"
          CopyToOutputDirectory="PreserveNewest"
          TargetPath="runtimes/$(RuntimeIdentifier)/native/%(RecursiveDir)%(Filename)%(Extension)" />
  </ItemGroup>
That’s how easy it is to pack stuff to precisely the folders you want, using NuGetizer.
I created three separate packages (for linux-x64, win-x64 and win-x86) since you can’t fit all those binaries in a single nuget package due to the sheer size. It wouldn’t be too user-friendly either :).
Setting up Playwright
When you reference the chromium native package, the binaries will be copied/included in the output path automatically.
So now we can register the actual launched browser as a singleton (async) service too:
builder.Services
       .AddSingleton(async services =>
       {
           var playwright = await services.GetRequiredService<AsyncLazy<IPlaywright>>();
           return await playwright.Chromium.LaunchAsync(new BrowserTypeLaunchOptions
           {
               ExecutablePath = Path.Combine(AppContext.BaseDirectory, "runtimes", "linux-x64", "native", "chrome"),
               Headless = true,
           });
       });
Note how we first await the async lazy service registered previously with builder.AddSingleton(_ => Playwright.CreateAsync());. We could just have initialized playwright itself above too, but this showcases how async lazy dependencies can depend on each other.
The key part is setting the ExecutablePath. The runtimes folder is automatically copied by the .NET SDK from the chromium native package. Note that the path refers to the linux-x64 runtime since even when you run this from Visual Studio, a Linux docker image will run the app, which is quite awesome and works surprisingly well, even for debugging!
We’re missing one important step at this point: chromium requires some libs on the docker image too!
Setting up Dockerfile for Chromium
The basic docker image we got from the VS template will not contain the necessary dependencies for Chromium to run. This was a quite painful set of trial & error and listing missing dependencies until I got all the required ones, which ended up being this lengthy list to run at the top of the Dockerfile:
FROM mcr.microsoft.com/dotnet/aspnet:6.0 AS base
WORKDIR /app
EXPOSE 80
EXPOSE 443
RUN apt-get update && \
    apt install -y libglib2.0-0 libnss3 libatk1.0-0 libatk-bridge2.0-0 libcups2 libdrm2 libxkbcommon0 libxcomposite1 libxdamage1 libxfixes3 libxrandr2 libgbm1 libasound2 libpango-1.0-0 libpangocairo-1.0-0
With those installed, we’re ready for scraping with Chromium and Playwright!
Scraping the Web with Playwright
There’s a ton of great documentation and samples on how to do this. So I’ll just briefly show the endpoint I set up to do this on this minimalistic sample app.
The app receives a scrape request with the following data:
public record Scrape(string Url, string Selector, bool BrowserOnly = false);
And a dedicated component will perform the scraping:
record Scraper(IHttpClientFactory HttpFactory, AsyncLazy<IBrowser> Browser, ILogger<Scraper> Logger)
{
  public async Task<IResult> ScrapeAsync(Scrape scrape)
  {
    //
  }
}
Note how it depends in turn from the relevant HTTP client factory, async browser, and logger.
I register it as a transient service:
builder.AddTransient<Scraper>();
Then build the app and add the endpoint mappings:
var app = builder.Build();

app.UseRouting();

app.MapPost("/", ([FromServices] Scraper scraper, Scrape request) => scraper.ScrapeAsync(request));
app.MapGet("/", ([FromServices] Scraper scraper, string selector, string url, bool? browserOnly)
    => scraper.ScrapeAsync(new Scrape(selector, url, browserOnly ?? false)));

app.Run();
Note that for convenience, I’m exposing both a POST endpoint (that receives the scrape request in the body) as well as a GET one (with automatic query string mapping by ASP.NET Core). Both mapped endpoints get the Scraper service and pass down the request.
The gist of the Playwright calls are:
var browser = await Browser;
var page = await browser.NewPageAsync();

await page.GotoAsync(scrape.Url);
await page.WaitForSelectorAsync(scrape.Selector, new PageWaitForSelectorOptions
{
    State = WaitForSelectorState.Attached
});

var elements = await page.QuerySelectorAllAsync(scrape.Selector);

foreach (var element in elements)
{
    if (await ReadOuterXmlAsync(element) is XElement node)
        results.Add(node);
}

return new XmlContentResult(new XElement("scraper", results));
At this point, you can run the app locally and see it working, which is great. But not the point of the blog post, hehe. So let’s set up the container and CI/CD so we can deploy it live!
Azure Container App Setup
I found that doing this via the CLI offers much better control over all the resource names you get, and allows for a better understanding of the pieces involved. For example, the log analytics step (creating, getting the shared key) and how it links with the container app environment was an interesting tidbit.
The individual steps are simple enough, but they have to be executed in a particular order. The official docs do a fair job of explaining the various options, but are nevertheless focused on one specific path. Laying out the ones I needed was useful for future reference.
GitHub Actions Deployment
I like to understand by CI/CD workflows intimately, so I’ll typically start from some sample or template and then rework it to my liking, structuring it in a way that makes sense to me.
Two particulary important steps that link to the previous CLI section, are the configuration of the container registry password and the azure credentials JSON as repository secrets. I like doing Azure automation in CI explicitly from shell scripts directly using the az CLI and configuring the azure credentials using a service principal created also via the CLI as explained in the docs, since that allows me to create the principal with permissions over an entire resource group (if needed), so I can deploy various resources beyond just the container app.
The build/deploy workflow is quite concise, involving just a few steps beyond cloning and running dotnet build (I’ll skip all the if: github.ref == 'refs/heads/main' I have since I only do deployments from main in this case):
-
Setup docker:
- name: ⚙ docker uses: docker/setup-buildx-action@v1 -
Login with the container registry credentials:
- name: 🔓 docker login uses: docker/login-action@v1 with: registry: dscraper.azurecr.io username: dscraper password: $ -
The container registry will contain CI-published images, and in order to make it easy to manage and prune the registry over time, I wanted to name images so they contained the branch where an image comes from as well as the year/month, so I can easily delete older ones over time. For that, a little shell command populates an envvar used during docker push:
- name: 📅 date run: echo "app_prefix=$.$(date +%Y-%m)" >> $GITHUB_ENV -
Use determined prefix plus commit SHA to push to the container registry using the Dockerfile:
- name: 🚀 docker push uses: docker/build-push-action@v2 with: push: true tags: dscraper.azurecr.io/$:$ file: src/Scraper/Dockerfile -
Deploy the image by updating the container app to point to the newly pushed image, using the azure service principal JSON in the repository secrets:
      - name: 🔓 azure login
        uses: azure/login@v1
        with:
          creds: $

      - name: 🚀 docker deploy
        uses: azure/CLI@v1
        with:
          inlineScript: |
            az config set extension.use_dynamic_install=yes_without_prompt
            az containerapp update -g scraper -n scraper --container-name scraper --image dscraper.azurecr.io/$:$

      - name: 🔒 logout
        run: az logout
With this in place, you can hit the scraper at some endpoint like https://scraper.teslarocks-42069.eastus2.azurecontainerapps.io?selector=body&browserOnly=true&url=https://clarius.org 😉.
All in all, I have to say I’m impressed with the combination of dotnet 6, minimal APIs, docker, and Azure container apps. It’s a breeze to develop locally and to publish in the cloud in a completely serverless way.
/kzu dev↻d