GitHub is an awesome platform for hosting your source code, and the issue tracker is pretty decent. Some might argue that it’s too simplistic and that larger projects require more features and customization, but I’ll beg to differ, and show you how you can tune it to your heart’s content by leveraging its comprehensive API, and do so even without writing a single line of code ;)
Automating GitHub
The developer documentation for the GitHub API is fantastic. You should go a scan its topics just to get an idea of its amazing breath, which covers everything from retrieving issues to creating new Git commits all via a friendly Json-based REST API. I wish this was the standard for all sites or services that host your data in one way or another.
If you’re a .NET developer, there’s something even better than a friendly Json-based REST API: a NuGet package!
PM> Install-Package Octokit
// or
PM> Install-Package Octokit.Reactive
The Reactive version supports should have parity with the non-Reactive version, but is much better for incrementally doing work across many items in the API (i.e. processing all Issues or reading all commits, etc.), since the observable notifies back your code incrementally as more data is fetched (by leveraging GitHub’s API paging automatically).
I started automating GitHub issue tracker quite a bit for our little project, and I realized that the features I was adding where quite general-purpose and could be easily reused. So I decided to turn them into granular NuGet packages that you can easily choose and pick for your particular project.
Introducing OctoHooks
OctoHook is the name of the project, since it leverages OctoKit for programming GitHub webhooks :). Since these octohooks typically need to write back data to GitHub via its API, and you need to give permissions to it, I made it very easy for you to self-host these hooks so you don’t have to trust me or anyone with your API credentials.
Just create a new empty ASP.NET Web Site with WebApi in Visual Studio (or open an existing one you want to use to host the webhook):
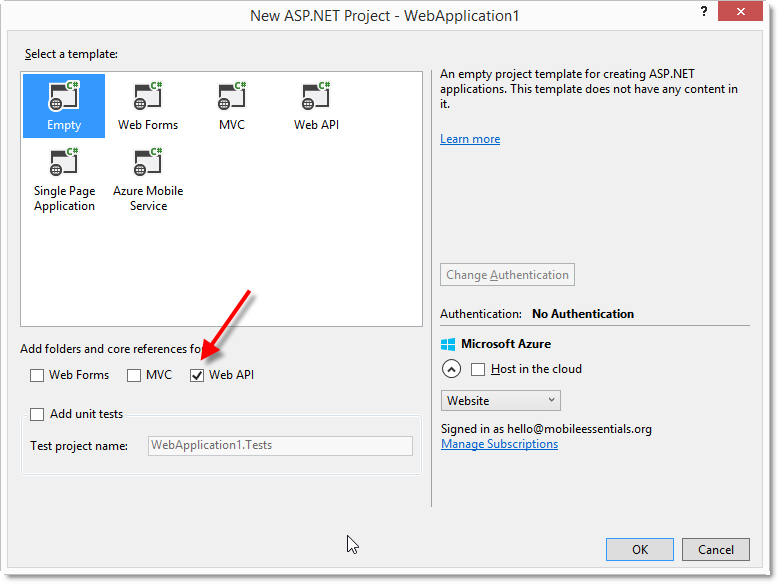
and install the OctoHook.Web NuGet package.
PM> Install-Package OctoHook.Web
You Web.config config will now contain the following content inside the appSettings section:
<appSettings>
	<!--
         ***** OctoHook *****
         NOTE: it's best to add the token via your app hosting service (i.e. in Azure app settings key/value pairs)
         rather than placing them in the clear here.

    <add key="GitHubToken" value="YOUR_TOKEN_HERE" />

         Optionally configure the trace level for the OctoHook stuff. It supports streaming logs from Azure.
         This attribute must contain a valid System.Diagnostics.SourceLevels enum value.

    <add key="TracingLevel" value="Error" />

    -->
</appSettings>
You can generate a GitHub API token by going to your account’s Applications page. Actions performed by the webhook will look as if they were performed by this user, so it may also be a good idea to create a bot account (which will need to have permissions on the repositories where you configure the webhook, of course).
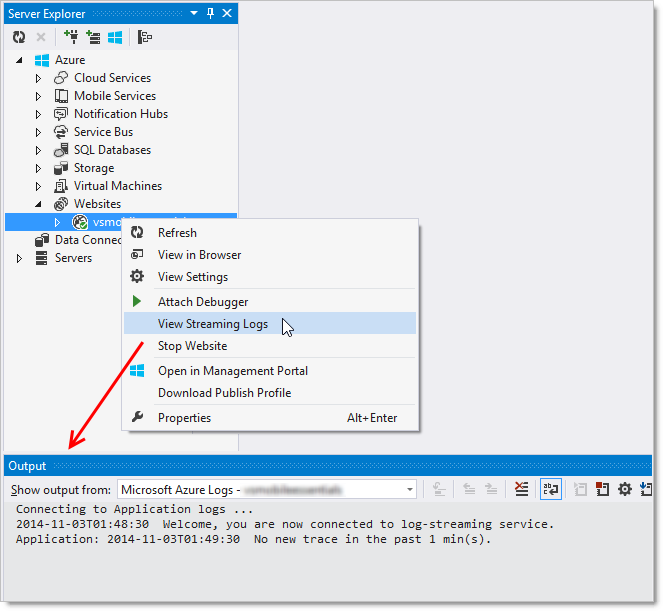
The tracing level is also useful for troubleshooting or even just knowing what the OctoHooks are doing in real-time, if you happen to deploy on Azure and use the nice Streaming Logs feature, which works great from within VS:
After you deploy this website to your favorite hosting provider, you can set it up as a webhook by going to the repository settings page, Webhooks & Services tab, and clicking the Add Webhook button. Unless you tweaked the default routes created by the WebApi project template, the webhook Url should be:
[your_domain]/api/github
The events to push to this webhook will depend on which specific OctoHooks you install, but it’s pretty safe to say that Issues and Push events are probably the most useful. If you will be experimenting further with your own OctoHooks, maybe just sending everything is more convenient.
Congratulations! Now you have set up a webhook that does nothing! :). Now let’s add some automation. I’ll just copy/paste some of the information that is already available in the OctoHook repository Wiki, which documents all the available OctoHooks.
AutoAssign
PM> Install-Package OctoHook.AutoAssign
The OctoHook.AutoAssign package extends GitHub Issues by automatically assigning issues to users specified in the issue title as :[username] or :me, such as Improve auto-assigning of issues :kzu or Improve auto-assigning of issues :me.
AutoLabel
PM> Install-Package OctoHook.AutoLabel
The OctoHook.AutoLabel package extends GitHub Issues by automatically applying labels to issues with a title formatted with one or more +[label].
Labels can be pre-existing ones or new ones. Existing labels are located first, in a case-insensitive way. So if you use +task and you have a pre-existing label Task, no new label will be created, and the issue will be assigned the capitalized Task label instead of assigning a new label task.
Any number of labels can be appended at the end of the issue title, and they are all automatically removed from the title.
Auto Close
PM> Install-Package OctoHook.AutoClose
The OctoHook.AutoClose package extends GitHub Issues by a automatically closing issues via standard GitHub mechanism commit messages (i.e. ‘fixes #123’), regardless of the commit branch (GitHub by default will only close after the commits are merged to the default branch).
This is very useful because for teams that use feature branches heavily, all commits go to non-default branches and therefore don’t cause the associated issues to be closed. This hook changes that behavior so that it works on all branches.
Learn more about supported keywords on the Closing issues via commit messages article.
Auto Link
PM> Install-Package OctoHook.AutoLink
The OctoHook.AutoLink package extends GitHub Issues by automatically linking tasks and user stories based on shared prefixes.
Depending on your planning process flavor, you may be using issues labeled Story (or lower-cased story) to distinguish them from Task or Bug issues. GitHub issues doesn’t know anything about either, of course, and keeping track of what tasks or bugs “belong” to which story is a manual process.
This hook detects a very simple issue title convention: an issue with a prefix like [uex] and labeled story or Story defines what the hook considers a “story prefix”. Issues that have the same prefix are automatically linked to that story.
Note: if the issue itself has a story label, it won’t be considered for auto-linking. Likewise, if the issue body contains an issue reference (i.e. #123) that references an issue with a story label, it won’t be considered either for auto-linking.
Once the hook determines the parent user story for an issue based on its “story prefix”, it will append the text “Story #123” linking to the right parent story. This link in turn causes GitHub to show the linked issue on the parent story history timeline.
AutoTask
PM> Install-Package OctoHook.AutoTask
The OctoHook.AutoTask package extends GitHub Issues by automatically creating and maintaining task lists across referenced issues.
Tasks lists are a really nice way to get a quick overview of the completion status of a given feature or user story:
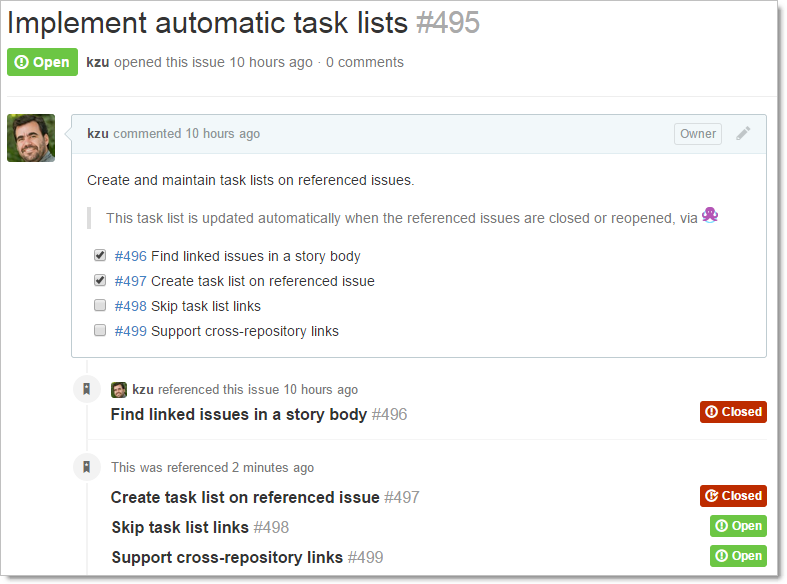
AutoTask will automatically create a task list on referenced issues, that will automatically be checked whenever the referencing issue is closed. In the above screenshot, issue #496 simply has a #495 reference in the body:
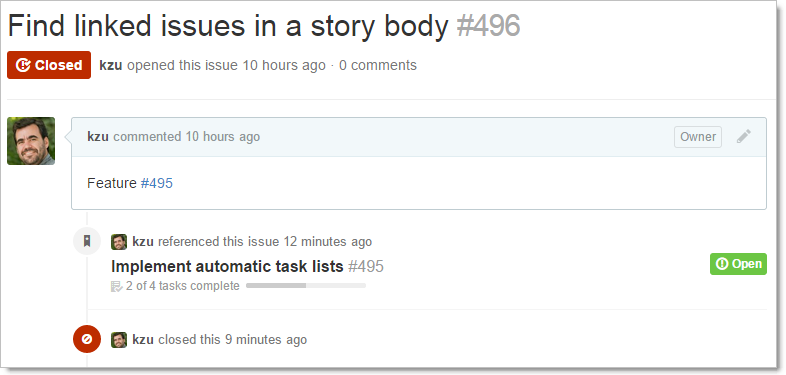
Since the task was closed, its corresponding item in the #495 issue task list is checked automatically. If you now closed #498, it would become checked right afterwards too via AutoClose.
AutoClose works with cross-repository references too, so you can automatically notify completion status on other repositories.
In a future post I will also show how to create your own custom OctoHooks that plug automatically into this GitHub controller.
Enjoy!
/kzu dev↻d